Article Summary
Majority of these websites are being run on WordPress in order to maximize their outreach. However, website may not want traction in certain areas of the world due to cases like treaty issue, potential cyber threat, etc. That’s when the feature of Country Blocking in WordPress comes handy. This article is dedicated to explain how to do Country Blocking in WordPress.
Numerous businesses, groups and communities are now turning to digital platforms in order to promote themselves and reach out to different customers. Majority of these websites are being run on WordPress in order to maximize their outreach. However, website may not want traction in certain areas of the world due to cases like treaty issue, potential cyber threat, etc. That’s when the feature of Country Blocking in WordPress comes handy. This article is dedicated to explain how to do Country Blocking in WordPress.
The businesses may also save on internet consumption bandwidth by using Country Blocking in WordPress. Also, there are countries in the world which are notorious for dispatching attack vectors over the World Wide Web. Hence, as a cautious business owner, it is important that you keep your website unavailable in those countries.
Country blocking Methods
By default, whenever a business launches a website on WordPress CMS platform, it is accessible by anyone across the world who has the website URL. But, by using the feature of the Country Blocking in WordPress, the businesses can save themselves from getting unwanted attention which may, later on, pose as a security threat. In this article, we shall discuss the two easy and effective ways in which you can do Country Blocking in WordPress:
- Country blocking using .htaccess file
- Country blocking using NGINX + GeoIP module
Let us now understand how each of these processes work.
Country Blocking using .htaccess file
In order to proceed with this step of the Country Blocking in WordPress, you shall be required to have admittance to cPanel or FTP Account. Once you have gained its access, follow the steps:
Step 1: Generate a list of IP addresses belonging to the countries from where you wish to block access

- Go to this website.
- From the first list of countries, select the country whose IP addresses you wish to block.
- From the following list which is about the format in which the list of IP addresses will be generated, select “.htaccess Deny”.
- Once you are done with the selections, click on the button to create ACL. The website shall create an access control list which will be used for Country Blocking in WordPress.
Step 2: Open up your .htaccess file
- The .htaccess file is available on the public_html directory and is an important file for setting WordPress configuration.
- Access this file through File Manager available in your cPanel. Alternatively, you may also access this file by connecting to your account via FTP Client.
- Once you have located the .htaccess file, it is time to insert the IP address list for blocking.
Step 3: Insertion of the generated list’s contents into the .htaccess file

- Select all the IPs using Ctrl+A (MAC users Command+A).
- Copy it using Ctrl+C (MAC users Command+C)
- Paste it in your .htaccess file using Ctrl+V (MAC users Command+V)
Country Blocking using NGINX+GeoIP module
In this method of the Country Blocking in WordPress, we program the server to automatically block any incoming requests from a country-specific address. This tutorial assumes that the server is running a Linux Operating System.
Step 1: Check for GeoIP module installation
- Install Nginx along with HttpGeoIpModule. You may check whether the current installation of Nginx is compiled with HttpGeoIpModule or not by typing the following command on the terminal: nginx -V
- If you see -with-http_geoip_module in the result screen after typing the command, then you may proceed further.
Step 2: Download the GeoIP database
- Download maxmind’s GeoIP database using the following command:
sudo apt-get install geoip-database libgeoip1 - The command downloads the GeoIP database and positions it in the following location:
/usr/share/GeoIP/GeoIP.dat
Step 3: Configure Nginx for blocking
- Now that you have the GeoIP database, it is time to configure it. Open the Nginx configuration file using the command –
sudo nano /etc/nginx/nginx.conf - Place the following piece of code at the beginning of the http code block –
geoip_country /usr/share/GeoIP/GeoIP.dat;map $geoip_country_code $allowed_country{default yes;RU no;CN no;}
3. Let us understand how the code blocks a country. For this tutorial, we are blocking IPs which are originating from Russia or China. Hence, using a variable “allowed_country”, we are allowing countries except for Russia (RU) and China(CN).
Step 4: Deploy a block page
- In order for these rules to take effect, open the website server’s block file and place the following piece of code inside the server block:
if($allowed_country = no){return 444;} - Thus, whenever a person from China or Russia will access your WordPress website, they shall be shown HTTP error code for the blocked country. One may alternately set HTTP status code (404-not found) or 403-access denied) as well.
Step 5: Reload or Restart Nginx
In order for the changes to apply, restart the Nginx server or reload it. This can be done using the following command:
sudo service nginx restart
Astra Firewall for Country Blocking in WordPress
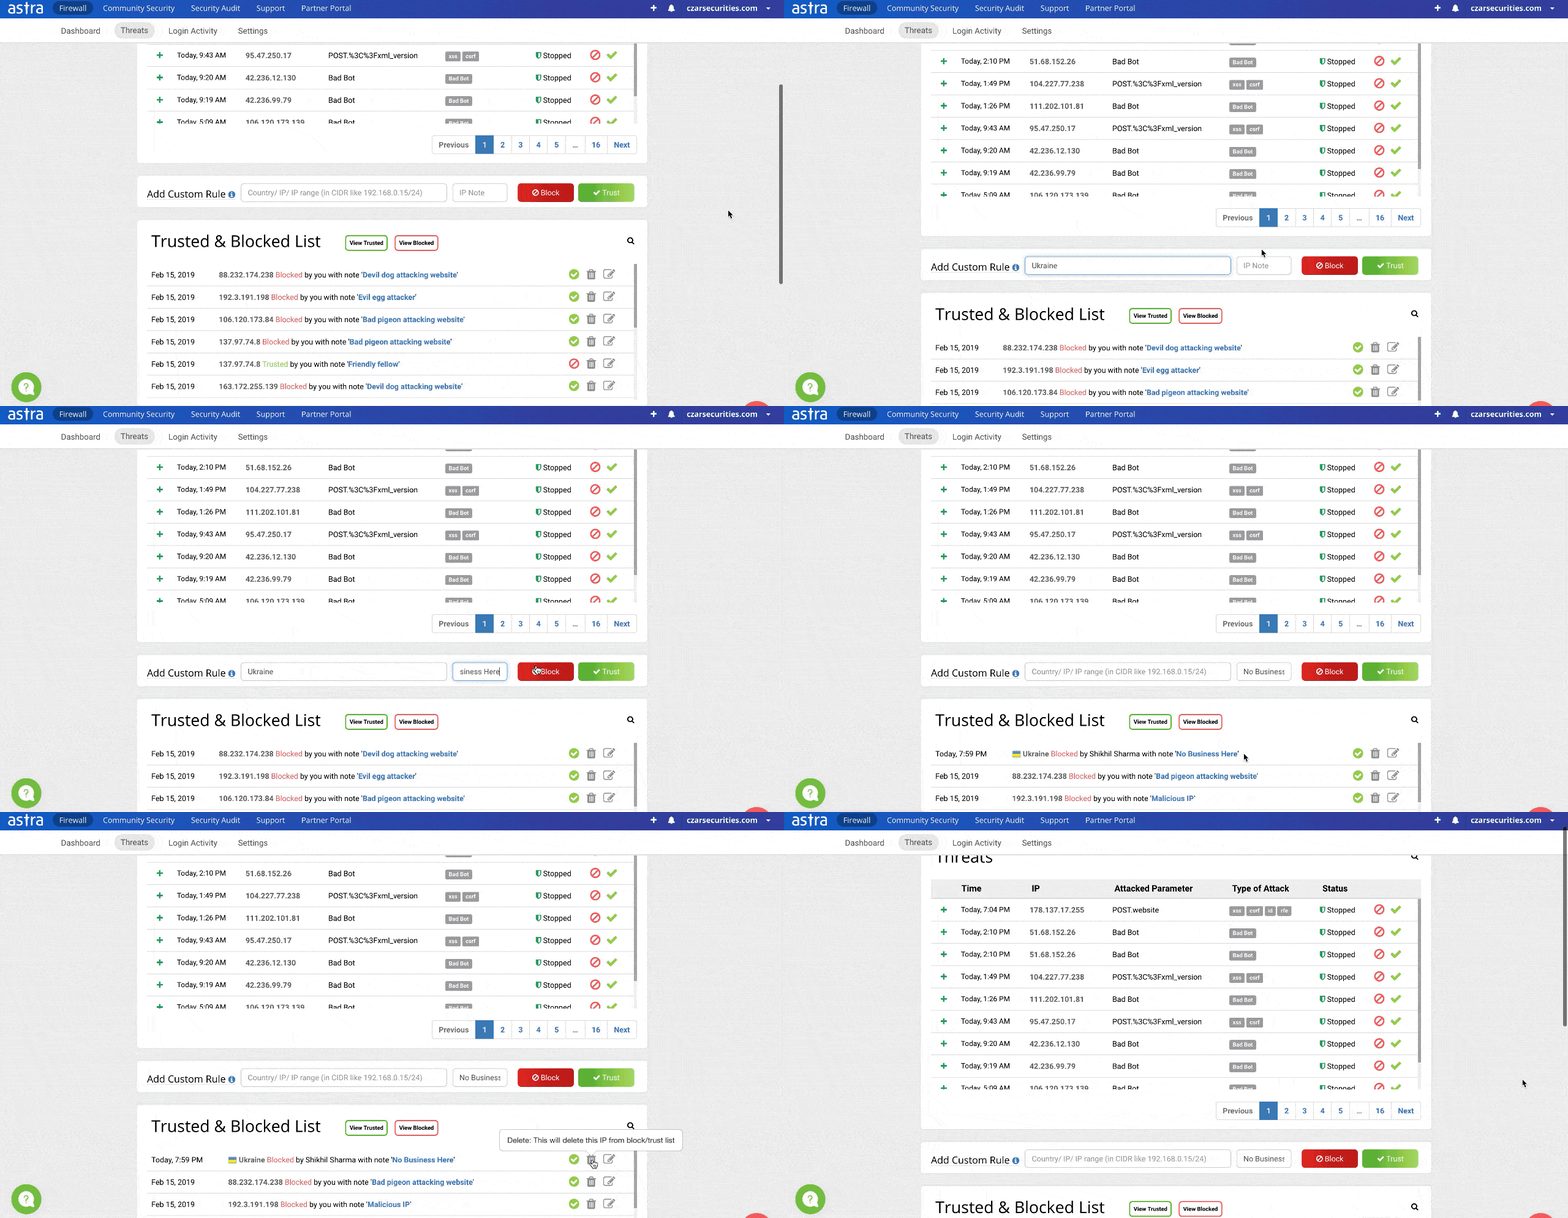
If you think that handling such technicalities may cause a break in the logic of your website or are unsure whether your solution will be effective in blocking or not, you may use Astra’s firewall for the same. In Astra, there is no fuss about downloading an IP list or coding. Just a one-click solution to blacklisting as well as whitelisting requests from certain countries. The steps are as follows:
- Install Astra Firewall and log into your Astra dashboard.
- Navigate to Threats tab
- Scroll down and find the section of ‘Add a custom rule’.
- Insert the country you would like to block and click on the Block button and it is done!
Conclusion
Thus, business outreach is good for the expansion of your business. However, with the advancement in threat levels, it becomes important that the CIA principles are maintained for your website. Hence, choose your website’s audience carefully and better be safe than sorry.


Hi Ananda Krishna,
Thanks for sharing useful information. I was almost tiered to block some country. I was working on security on my website. And I found your post about Blacking Country.
I need one more help.
Can you share me how to block any OS to access my website.